A solid short game is where golf rounds are won and lost. Most amateur golfers know this, yet the average player still spends the bulk of their practice time on the driving range. Having a putting surface at home changes that equation completely. You can roll a few putts before work, experiment with your stance on a Sunday afternoon, or just chip away at the yips without booking a tee time. The question is not really whether a backyard putting green is worth it. The question is how to build one that performs the way you actually want it to.
This guide breaks down the key decisions involved, from choosing the right surface material to getting the contours right, so you can go in with realistic expectations and a clear plan.
Why Backyard Putting Greens Have Become So Popular
Golf participation surged during and after 2020. According to the National Golf Foundation, the sport added more than 3 million new golfers between 2020 and 2021 alone, and participation has held at elevated levels since. More players means more demand for practice options that do not require a club membership or a long commute. A backyard putting surface fits that need perfectly. It is private, available any time, and over a multi-year span it typically costs less than paying for regular range time and green fees.
Beyond pure convenience, there is a real skill benefit. Research in motor learning has consistently shown that distributed practice, meaning short, frequent sessions spread across days, tends to produce better long-term retention than massed practice in single long blocks. A putting green ten steps from your back door makes distributed practice almost effortless.
Natural Grass Versus Artificial Turf: The Core Trade-Off
This is the first real fork in the road. Natural bentgrass or Bermuda greens look and feel authentic, but they demand a level of maintenance that most homeowners are not prepared for. We are talking daily mowing with a reel mower set to around 0.125 inches, precise fertilization schedules, fungicide applications, aeration, and consistent irrigation. Miss a week during a hot spell and the surface can deteriorate badly. For golfers who genuinely love turf care as a hobby, this can be rewarding. For everyone else, it quickly becomes a burden.
Artificial turf has closed the performance gap significantly over the past decade. Modern synthetic fibers are engineered specifically for putting, with consistent pile height, controlled ball roll, and surface speeds that can be calibrated to mimic real course conditions. Choosing the right turf for putting greens involves looking at fiber shape, pile density, infill type, and the backing system underneath, all of which affect how the ball behaves and how long the surface holds up under foot traffic and UV exposure.
| Factor | Natural Grass | Artificial Turf |
| Initial Cost | Lower materials, higher install labor | Higher materials, moderate install labor |
| Ongoing Maintenance | Daily mowing, fertilizing, watering | Occasional brushing, rinsing, infill top-up |
| Water Use | High, especially in dry climates | Minimal |
| Surface Consistency | Varies with weather and season | Consistent year-round |
| Lifespan | Indefinite with proper care | Typically 10 to 15 years |
| Realistic for Most Homeowners | Only with serious commitment | Yes, for most climates and skill levels |
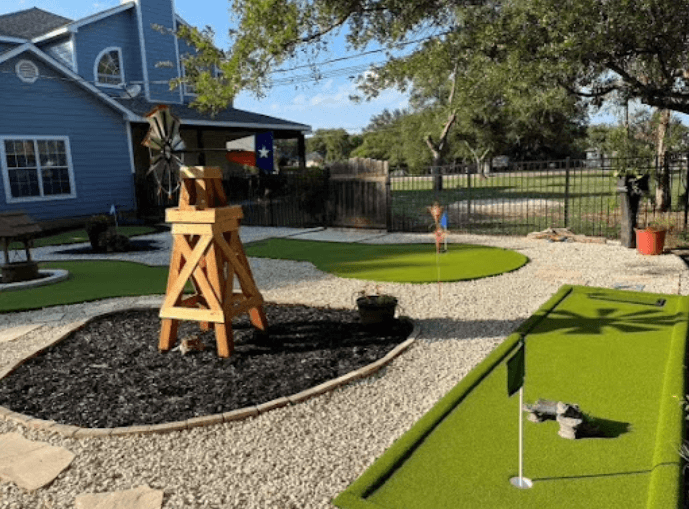
Designing the Shape and Contours
A flat putting green is functional, but it gets boring fast. Real practice value comes from contours that force you to read breaks, adjust your pace, and think about angle of approach. Even a modest amount of slope, somewhere in the range of one to three percent across different sections of the green, adds meaningful variety to your practice sessions.
When planning the shape, think about how many hole positions you want. A single cup is fine for basic drills, but most golfers find that three to five cups placed in different zones of the green give them a much richer practice routine. You can work on uphill putts, downhill putts, left-to-right breaks, and longer lag putts all within the same space.
Size Considerations
A common question is how large the green needs to be. A space of around 200 to 400 square feet gives you room to work with multiple hole positions and practice putts from meaningful distances. Smaller than that and you are essentially limited to short-range drills. Larger than 600 square feet starts to feel like a significant landscaping project. Most residential installations land somewhere in the 300 to 500 square foot range and provide more than enough variety.
Fringe and Surrounds
Do not overlook the area immediately surrounding the green. Adding a fringe collar of slightly longer synthetic turf, or a natural grass border, lets you practice chip-and-run shots, not just putts. This small design choice multiplies the practice value of the space without requiring much additional square footage. Some homeowners also add a small sand bunker adjacent to the green for bunker play practice, though that adds complexity to the build.
See also: Modern Home Architecture: Designing Spaces That Inspire Everyday Living
The Base: What Happens Underneath Matters Most
Surface quality is only as good as the base it sits on. A poorly prepared sub-base is the most common reason backyard putting greens end up uneven, spongy, or prone to drainage problems. Most professional installations use a compacted aggregate base, typically crushed granite or decomposed granite, layered to a depth of three to four inches. This provides stability, allows water to drain through quickly, and holds the contoured shape you build into the design.
Drainage is particularly important in climates with heavy rainfall. A putting surface that pools water after rain becomes unusable for extended periods and can develop subsurface problems over time. Proper base preparation, combined with a permeable turf backing, allows water to pass through at a rate that typically exceeds natural soil infiltration. Many high-quality synthetic putting surfaces drain at 30 inches per hour or more, which means they are ready to use again well before a natural green would recover.
Ball Roll, Speed, and Surface Performance
Golfers familiar with Stimpmeter readings know that course greens typically run between 8 and 13, with tournament conditions often pushing to 12 or 13. Backyard synthetic greens can be designed to hit a target range, and the pile height of the turf is the primary lever. Shorter pile height, around 0.5 inches, produces faster surfaces closer to tournament speeds. Taller pile heights slow the ball down and feel more like a casual club green.
Infill material also plays a role. Silica sand infill is common and adds weight to the fibers, which affects how they flex under the ball. Some premium installations use a combination of silica and rubber crumb, though for putting surfaces, pure silica or a specialized putting green infill tends to produce the most consistent roll. The goal is a surface where the ball behaves predictably, responds accurately to slope, and does not kick or bounce unexpectedly on contact.
- Pile height of 0.5 inches or less for fast, firm surfaces similar to tournament greens
- Pile height of 0.75 to 1 inch for a medium-speed surface suitable for recreational practice
- Nylon fibers generally hold up better under heavy foot traffic than polypropylene
- Dual-layer backing systems improve dimensional stability and resist wrinkling over time
- UV-stabilized fibers are essential in sunny climates to prevent color fade and fiber breakdown
Maintenance Expectations Over the Long Term
One of the main advantages of synthetic putting surfaces is low maintenance, but low does not mean zero. Keeping the surface in good shape over the years requires a few consistent habits. Brushing the fibers periodically prevents matting, especially in high-traffic areas around the most-used hole positions. Rinsing the surface occasionally removes dust, pollen, and debris that can accumulate and affect ball roll. Checking the infill level every year or two and adding a thin top-up layer when needed keeps the surface performing as designed.
Leaves and organic debris should be cleared regularly, not just for aesthetics but because decomposing organic matter can break down the backing over time if left to sit. A leaf blower handles this quickly. In regions with freezing winters, synthetic greens hold up well through freeze-thaw cycles, though the base can heave slightly in areas with significant frost. This usually corrects itself as temperatures rise, and a well-compacted base minimizes the effect.
Bringing It All Together
Building a backyard putting green is one of the more satisfying home improvement projects a golfer can take on. The combination of a well-prepared base, quality synthetic surface material, thoughtful contouring, and a few strategically placed hole positions produces a practice space that genuinely improves your game over time. Start by measuring your available space, think through how you actually practice, and take the surface material decision seriously. The choices you make early in the planning process determine almost everything about how the finished green performs, and how long it stays that way.